Saturday, July 28, 2012

Stepping back in time

Maybe it's fatherhood. Maybe it's nostalgia. Maybe it's some sort of innate desire to recapture the glory days of my youth.  I dunno. But whatever it is, something deep down inside has been inspiring me to get my collection of video games back.

We didn't have much in the way of video or computer games when I was a kid, partly because we were too busy playing outside but partly because my parents (wisely) did not allow us to partake in those kinds of electronic distractions.  They encouraged us to build things with Legos, play with rubber band guns in the basement, dig holes in the yard, ride our bikes down to the park, go to the local pool to swim...as long as we were home by bedtime the neighborhood was pretty much fair game. It was a great way to grow up, and I hope I can give my son a similar type of childhood too.  As my siblings and I got older, and had something resembling disposable income thanks to paper routes and after-school grocery store jobs, we started to indulge in the electronic entertainment arts a little more.  Over the years we had various incarnations of Nintendo consoles like the Game Boy, Game Boy Color, Super Nintendo (we missed out on the original NES), Nintendo 64, Game Boy Pocket Color, Game Boy Advance, Game Boy Advance SP, and on down the line.  Put together a list of classic games from the early- to mid-90's era, and chances are we owned 'em: Super Mario World, Metroid II, Super Metroid (very close to the top of my list of All Time Favorite Games), Chrono Trigger, Final Fantasy III, Super Mario 64, Pilotwings 64, Zelda: Link's Awakening, Zelda: Ocarina of Time, Super Return of the Jedi, F-Zero, and the list goes on.
My first Game Boy was black, and I spent many nights poring over Zelda puzzles on it.
I'm now in my early 30's and still enjoy playing video games when time allows. I've got an Xbox 360 and enjoy games like Gears of War (own and have beaten all 3), SSX, Fallout 3, and recently, Oblivion (I know I'm way behind the times with this, but I missed it years ago and want to play through before I tackle Skyrim).  But still, there's nothing like sitting down at night with a Mountain Dew and some classic SNES games, which brings me clear back to my original point here: lately I have been attempting to rebuild my collection because, over the years, a good deal of my video games have been lost, traded, or (*snif*) sold on eBay.  Thanks to the Virtual Console, this is is much simpler than actually owning a cabinet full of physical video game systems and tracking down all their respective classic games (some of which can be quite expensive nowadays).  We've got a couple thus far, like Super Mario Bros. 3, Ocarina of Time, Sonic the Hedgehog, and most recently, Super Metroid, but one problem with the Virtual Console is the controller.  The standard Wii controller works, but not very well, which makes some of the games like Super Metroid very tricky.  I have an old Gamecube Wavebird controller, but the oddly-shaped buttons make precision maneuvers very tricky to pull off in some of the classic games of yesteryear. The solution? A Classic Controller Pro, which I finally picked up last weekend.
Playing through some of the trickier stages in Super Metroid (can you tell I like this game?) was a breeze with the new controller, though it was a little tricky to get some of the jumps in Super Mario Bros. 3 just right. For some reason, Nintendo configured the Classic Controller Pro such that when playing original NES games, the a/b buttons are actually more difficult to press than on the standard Wii controller.  On the Wii controller, as well as the original NES controller, the a/b buttons are situated right next to each other. But on the Classic Controller Pro they are angled upward, which makes it difficult to pull off maneuvers in which both buttons need to be pressed simultaneously.
On the NES and Wii controllers, it is possible to press the left button (a or 1) with the top of your thumb, and while holding it down rock the joint of your thumb to press down on the right button (b or 2).  This is very handy in the Mario games, where pressing a/1 makes your character run fast enough to get a boost when jumping with the b/2 button.  In those situations, I suppose going back to the Wii controller would probably work but that means adjusting to the Wii's small d-pad and 1/2 (i.e. a/b) buttons.  Still, these minor annoyances pale in comparison to the ability to revisit a vast library of classic games (the Virtual Console is missing some of the great ones, but hopefully one day they will add more) without messing with a pile of dusty cartridges and game systems. I hope my son will one day enjoy playing these old games too, but by the time he's old enough to do that we'll probably have Holodecks and he'll be too busy with Parrises Squares to pay attention to dad's crusty old collection of pixellated games from the stone age. And if that day ever comes, you know where to find me: sipping Mountain Dew while going head-to-head with Ridley.

Monday, July 23, 2012

Pumping Air

This post is, somewhat serendipitously, a follow-up to my previous garage-related post.  While that one was all about speakers, this one is all about a bunch of hot air. Or cool air.  Or whatever the air temperature happens to be at the moment.  Anyway, the point is I finally got an air compressor.  Whee!

Two horses and four gallons of air-compression goodness
I have wanted one of these for years, and way back in 2004 I even went out and bought a cheesy 1-gallon unit from Menard's. It took several minutes to bring its tiny little reservoir to maximum PSI, but it worked for filling up car tires so I didn't complain. I gave it to my cousin about two years later, and didn't really miss it that much until my wife and I bought the house we currently live in.  The big attached garage sure is nice, but there have been a host of times since we moved in that I said a variation of the phrase "If only I had an air compressor..."  And not just for filling up tires, either (though that certainly does come in handy).  Here's a couple examples of why an air compressor is a great tool to have around:

• Cleaning dirt and dust off the lawnmower and other small engine tools
• Cleaning dirt and dust off engine parts under the car hood
• Cleaning dirt and dust off kids' toys
• Cleaning gunk and residue off old household items
• Bringing new life to an old shop-vac air filter
• Drying off wet objects
• Quickly removing sawdust, dirt, and dead bugs from the garage
• Working with pneumatic tools like impact wrenches

Until now I haven't had one though, which means any time a tire is low or something needs to be cleaned with a burst of air, I've had to take it down to the gas station or (gasp!) use one of those little cans of compressed air you can buy at Staples. I remember a time last February when my friend Jon and I actually had to walk our bikes a mile down the road to the gas station to fill up the tires, just so we could start our bike ride.  Not cool :(  The problem is, these things aren't cheap.  A decent compressor runs at least $150-$200 new, and prices kind of skyrocket from there.  Some are meant for different applications, some are bigger, some fill up quicker...yeah, you never thought compressed air was such a hassle, eh?  Fortunately, my dad came to my rescue several months ago with this little gem:
A medieval torture device? No, not quite...
It's a portable air tank he made from an old propane canister, and is great for all the aforementioned tasks...except when it runs out of air.  Fortunately there are several places in town, from tire shops to gas stations, which will fill it up for free.  It's a nice stopgap measure but there's just something nice about having your own for-real air compressor :) But since the price tag was holding me back, I went to the internets for some help.

I belong to a group on Facebook where people here in town post things they want to buy or sell--sort of like a less creepy version of Craigslist.  It's a perpetual online garage sale of sorts, which is continually updated with all manner of clothes, tools, old electronics, nicknacks, and other tchotchkes that people in town and the surrounding communities want to trade. I posted that I was looking for a small air compressor, and less than two hours later someone responded that they had one to sell.  The next day he and I met up on the university campus where we tested it out, and $55 later I drove home with this little blue fella.


It's clearly not new, but not that bad overall.  The oil dipstick is broken off (it's the small circular protrusion sticking up from the solid grey motor), the oil needs to be changed, one of the pressure gauges doesn't work, and the tanks had a fair amount of brown condensate that had to be drained out, but other than that it's in great shape.  I also picked up a good rubber air hose (tip: don't mess with the polyurethane or PVC air hoses. They're more of a hassle than they're worth) and sure enough, it works like a charm.

Like a shop-vac or most power tools, an air compressor isn't one of those things you find yourself using every day unless your job depends on it.  But the times when it's handy to have, it's really handy.

Wednesday, July 18, 2012

This one goes to 11

One of the things I like most about our house is the big attached garage. It's not gigantic, but it is large enough to park two small sedans and still have room for a workbench and an assortment of semi-rusty tools ranging from a hydraulic car jack to a reel lawnmower to, a sledge hammer. Like my dad, I enjoy going out to the garage and tinkering on things, though my version of tinkering usually means attempting to fix something small or cut up some wood, while my dad's version of tinkering often involves a welder, oxygen-acetylene torch, or rotary band saw.  Clearly I have a long way to go.  But last I finally got something put in my garage that I've wanted to get for a long time: speakers.

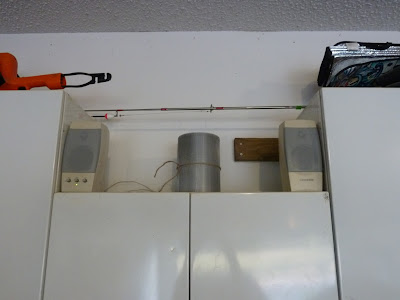
Behold the mighty speakers as they stand guard over a roll of soffit vent mesh
When I'm on the garage I like to listen to something, usually NPR or a podcast, to keep my mind busy. Most of the time this involves turning the car radio on and rolling down the windows, but if my hands are dirty and greasy it can spell doom for the already worn-out upholstery.  And if I have to disconnect the car battery, there's really no other option for listening to talking heads or tunes. Or both.

So for the past three years I have been engaged in an on-again-off-again search for something, anything, that would let me fill the airwaves with aural bliss when I'm working on something in the garage. We looked for radios and boom boxes at yard sales, and went online to see if we could find a radio or CD player or something that also had a line-in jack so I could play podcasts from my iPod.  No dice.  The ones we found were either too big, too small, or broken.  Recently my wife told me, in one of those I-can't-believe-I-never-thought-of-this-before moments, that I might just look in to buying a pair of speakers.  And sure enough, it seemed like the ideal solution since my old iPod plays podcasts as well as radio broadcasts and NPR programs thanks to the technological wonders of iOS apps.  Only trouble is, I didn't want to shell out good money for new speakers that would just get all dirty and gross in the garage.  Fortunately these sorts of things aren't too difficult to find, and sure enough when we were browsing at the Habit For Humanity Restore last weekend my wife spotted the above-pictured pair of old Gateway-branded Altec Lansings just waiting to be purchased.  They sounded great, and the price? A measly $3.  Cha-ching!

Putting up the speakers also gave me the push I needed to finally get a power strip put up on the side of the workbench, so I can turn on the overhead light (and now speakers) with the push of a button instead of manually plugging them in each time.  Now just I need to get head to Lowe's to get a some hardware to keep all those unsightly cords under control...

Thursday, July 12, 2012

Vinegar and whatnow?

Apparently for a cleaner to be "green,"
it literally has to be green.
We have tried all sorts of cleaning products for the bathroom and kitchen over the years, with varying degrees of success.  When we first bought our house we used anything we could get our hands on, like Soft Scrub, Windex, Tilex, CLR, Comet...basically anything in the household chemicals aisles at Lowe's or Walmart.  Even some semi-hippie eco-friendly cleaners from Seventh Generation and Clorox's "Green Works," which I think is really just regular cleaners dyed green.  Some worked, some didn't, and some are still sitting on the shelf in our storage room.  For the bathtub and shower we tried various incarnations of the classic scrubbing bubbles, including a particularly bad store-brand version, but nothing seemed to work all that well.  Or rather, they worked but were far too expensive to use regularly.  For a while we tried using a weird daily shower cleaner but aside from leaving the bathroom smelling of ammonia and artificial flowers, it didn't seem to do all that much.  It's not that these products didn't get our showers and sinks clean, but they just weren't that impressive when compared to how much money we had to spend on them.  Particularly the shower cleaners, where taking care of the tub could use up a fourth of one bottle of cleaner.

So a few days ago, after some encouragement by my wife as well as some checking online, I decided to give plain ol' vinegar and baking soda a try. You know, that combination that kids used in 4th grade science fairs to make volcanos? Yeah, that stuff.  I had an empty spray bottle lying around that I managed to convert into a bottle of vinegar spray using nothing more than that jack-of-all-trades, the Sharpie marker:
Notice how the bottle of cleaner has been cleverly transformed into a bottle of vinegar.

I took the spray bottle into the bathroom, doused the shower floor with it, poured on some baking soda, and sat back to watch the foaming commence.  And foam it did, for a minute or so, after which I scrubbed the whole works for a while, rinsed everything off with water, and voilĂ ! One clean shower.  The whole process was remarkably simple, and didn't leave me feeling woozy like often happens if I'm stuck in a small bathroom full of cleaner fumes.  Though if you don't like the smell of vinegar, you might be out of luck with this method :)

Tuesday, July 10, 2012

Following Up

This post is a bit technical, but since you are reading a blog, and this post pertains to reading blogs, I think you might enjoy it even if you are not a technically-minded individual.  This post also has nothing to do with home repairs :)

I enjoy reading blogs, and many of my friends and coworkers keep online journals of some sort.  It's a nice way to stay up to date with people, but things can get a little tricky when you ("you," in this case, referring to anyone who enjoys reading blogs) find yourself with more than a couple blogs to follow.  It's a hassle to log on to various blogs and check up on things, and pretty soon you might find yourself with dozens of blogs to visit with no hope of staying current anymore.  Sure you could put all those blogs in a Bookmarks folder in your browser, but you still need to visit each one individually and hope they have new content. It's so much to keep track of!

Behold...the RSS Feed Icon!
What's a confused web surfer to do?

The answer is simple: use an RSS reader.  A family member recently asked me to help her set up an RSS reader, and in doing so I realized it might be worthwhile to explain things here on my blog too.  I would be lost without my RSS reader, and find it incredibly useful when managing all the blogs I follow, so I thought you might find this information to be helpful too.

The basic concept goes something like this: RSS stands for Really Simple Syndication. (or, Rich Site Summary. But it really doesn't matter.)  Almost every blog has an RSS feed that anyone can subscribe to, and once you do, you can see each blog entry as a headline in a list.  And the entries you have not read will be marked, just like unread emails in your email program.  When you open your RSS reader you will instantly see all the blogs you follow as well as which entries you have not read.  It's kind of a way for you to consolidate your blogs in one central location, and read them in a more efficient manner.

Confused?  Oops.  Well then, let's try a visual example.

My RSS reader of choice is Google Reader, but it requires users to have a Google account.  Many email programs have RSS readers built in, and Windows users have a host of options from which to choose. Mac users need not fret though!  There is the excellent NetNewsWire as well as a bunch of other programs too.  Most of these programs are free, which is always nice.  I prefer Google Reader because I use Mac and Windows computers, and since Google Reader operates from any web browser I can access it anywhere.  But no matter which RSS reader you choose, they all perform the same basic functions.  The trick isn't to find the best one, but one that works for you.  And if you don't know where to start, just try one and see what you think.

Here's what my RSS reader home screen looks like:

(click for larger version)
Does that kind of screen look familiar? It ought to--it mimics the layout of most email programs. On the left is a list of all the blogs I follow, and on the right is all the entries for a particular blog.  When I logon to reader.google.com, any blogs that have been updated show up on the left-hand side in boldface along with the number of new entries.  Simple, eh?  Google Reader has a lot of other useful features too, like sorting blogs into folders, renaming blogs (I rename all the blogs I follow so they show up as the first name of the author, rather than the blog title. Helps things stay a little more personal.) marking items as unread, marking individual blog entries as favorites, and other tools that help you manage all the clutter.  And most RSS programs offer similar options, so if you don't want to use Google Reader chances are any of the RSS programs you will find are likely to have similar functionality.

So how do you get your RSS reader set up?  This too is pretty simple.  In Google Reader, you just click the Subscribe button and type the address of a blog you want to follow:

It will then be added to the left-hand side of your screen and you are then free to sort, rename, read, and organize to your heart's content.  Easy as pie!

RSS readers are handy for gathering news as well as reading blogs.  Most news organizations have RSS feeds for the stories they post, which can be read in an RSS reader just like blogs.  For instance, the Washington Post has RSS feeds brown down into dozens of categories.  So rather than logging on to their main web page, you can just subscribe to the RSS feeds that have news and information you care about.  Then when you open up your RSS reader you will see not only the blogs you follow, but the news stories you care about.  Nifty, eh?

Here's a short video that explains things further, and even though it's kind of old it's still worth checking out. I hope this post was useful, and if you have any questions just leave a comment and I'll be happy to help!

Friday, July 06, 2012

A Board Sandwich

A few months ago my dad and I installed a ceiling fan in our living room, a process that was equal parts fun, fascinating, and sweaty since most of the work involved crawling around in the attic.  Even though we put the fan up in March, temps were hot enough that more than a few minutes of attic-time resulted in sweat beading up on the sides of my safety goggles.  The whole operation went remarkably smooth though, and to this day my wife and I continue to enjoy the cool breeze afforded by the ceiling fan--particularly when temps are consistently above 100 degrees outside and our air conditioner occasionally struggles to keep up.  But as we were taking the final extension cords and hammers down from the attic, we noticed a problem that would have to be corrected someday.  Behold, the Broken Rafter of Uncoolness:
Not shown: the single tear...I mean...drop of sweat rolling down my face
Here's a close-up, just in case you're curious:

And for the past several months this rafter has remained broken, always in the back of my mind as one of those projects I'll get to someday.  My guess is that the rafter cracked not because of excessive load, but due to expansion and contraction over time.  It's not mission critical, and for all I know could have been broken for years, so what's a few more months?  Well, this past weekend I decided that someday had come and I would finally get the rafter all patched up.  I waited until about 8pm when our son was in bed and things had cooled down slightly.  Even though the attic would still be sweltering, I figured this was the kind of project that might never had an ideal date and time on which it ought to be completed, so I just went for it, carpe'd the salvÄ“, and decided to fix that rafter once and for all.  My plan was to sandwich the broken joint between two pieces of plywood, so the first step was to cut the plywood:
A circular saw. One of those tools you don't use every day, but sure is nice to have when you need it.
I cut two pieces of 3/4" plywood, 3.5" by 9", which was plenty long enough to run the length of the broken joint and then some.  The next step involved taking everything up to the attic and getting started on the repair.
My trusty little halogen work light. Because, y'know, it wasn't hot enough already in the attic
DeWalt 7.8-amp drill...check. Self-boring torx-head wood screws...check.
Once I was in the attic I got to work on securing one side of the board sandwich to the rafter. Think of this like two pieces of bread (the plywood) with a rafter in the middle. Delicious, eh? Though I doubt they'll be selling this at Burger King anytime soon.  Wait, on second thought...

So anyway, here's what things looked like after I got one side taken care of:
The broken joint is right in the middle, and I figured three screws on either side would be enough to hold it.  On the left side you'll see two screws, because I twisted the head right off the first one.  Oops. Other than that things went rather swimmingly, and the final product looks something like this:

 The joint is solid and should hold for the life of the house, but I do wish I could have gotten the broken ends to line up a little better.  It's the best I could do while working solo, and all in all I am very pleased with the result.  All in all the whole project took a little less than an hour too, which meant there was plenty of time for my wife and I to watch our latest Netflix pick, The Green Lantern.  It only took about 10 minutes before we mutually agreed that our time would be much better spent watching Star Trek :)

Monday, July 02, 2012

Low Horse

Some of my friends are in a band called Low Horse, and they have a couple songs streaming online from their new EP, "Songs." I really like their tunes, and you might too. Enjoy!