Wednesday, May 30, 2012

Getting a handle on things

Just a heads-up that this won't be the most interesting post ever, or even that noteworthy. But since I'm using my blog to showcase the things we are doing around our house recently, I figure it might be worth a mention.

Recently one of our inside door handles started to malfunction.  Specifically, it would not open after the door was closed.  This handle is attached to a fairly nonessential door that separates an entryway in our house from the laundry room, so if the door didn't work correctly it was not going to be the most challenging of home ownership issues.  Still, we did want to do something about it, so I took the handle apart, squirted some Liquid Wrench Silicone Spray (one of my favorite substances to have around) into various crevices, put the thing back together, and it worked just fine.  Problem solved!

Except not really.  A week later the handle was even worse, and wouldn't turn at all.  So I took it apart once again and discovered that the pin mechanism (the thing that retracts into the door when you turn the handle) was broken.  I have no idea how this happened, but the plastic build told me that poor craftsmanship could have been the culprit.  In any case it was not repairable, so we went to Lowe's and picked up another handle which I installed last night.  It's kind of a burnished bronze finish, which sure beats the faux gold finish on the previous handle, and we are now considering buying more of these handles to replace other doors just because they look so good.

Our door, sans handle.

The old broken handle, and our new replacement handle. Yay!

Our door, with handle. (Like I said, this was not going to be an especially exciting post, folks)

The old-style handle on the left, and our fancy-pants new handle on the right. Whee!

Tuesday, May 22, 2012

Painting Pics

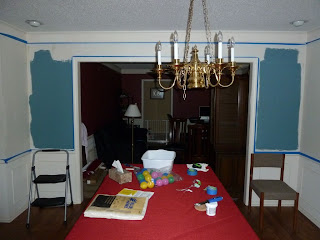
And as promised, here's a couple pictures from the dining room repainting.  It looks like an awful mess right now, but that tends to happen with painting projects.  I promise you things will look much better when we're all done!

We have painted without taping the edges, but have found that the time spent in taking this extra step is generally worth it in the long run.

After much trial and error, we settled on this color thanks to our friend Sarah who is a genius when it comes to interior decorating. The room just beyond the opening is a deep red, and the dining room had to have a bold color that could hold its own against the red.

This primer was tinted to match the actual color, but without the eggshell finish it looks rather dull and bland. But since it's just primer it's not really supposed to be shiny and fancy.

The finished walls, after two coats of paint.  The top and bottom need a coat of white paint yet, since the existing paint is kind of dull and faded, but the hardest part of the job is done.

Monday, May 21, 2012

Eclipsing

Did you see the Eclipse last night?  My brother called me about 8:30 to remind me to go outside and catch a glimpse of it, but since I had neither proper viewing glasses or a welding helmet, I decided not to risk damaging my retinas and stay indoors to continue working on the painting project my wife and I were already engaged in when he called.  It sure would have been cool to go watch though, and hopefully we can get some solar viewing in during the Transit of Venus in a couple weeks. But even though we missed the eclipse, we did manage to eclipse a layer of primer with paint...so perhaps that counts for something.

We are almost done painting our dining room, and so far it looks fantastic.  Using spackle to fill in some nail holes in the wall worked very well, but for the little nicks and dings I mentioned before we just painted right over them.  They were too shallow for spackle, and with the new coat of paint they are barely noticeable even if you know where to look for them.  After that we applied an entire coat of primer, though I'm not exactly sure why.  The clerk at Lowe's kind of talked us into using primer, even though we have painted before without it.  I think it works best if you are painting a wall with no previous paint, like new wood or drywall, because the purpose of primer is to give the actual paint a good surface to which it can adhere.  After we had primed the wall we both agreed that it probably wasn't necessary, but I guess we can rest easy knowing we went the extra mile anyway even if it didn't actually help us out that much. It certainly didn't hurt things, so we've got that going for us :)

After the primer dried on we went over the whole thing with two coats of Olympic Premium One, because on textured walls like ours it's almost impossible to get everything covered in one coat (and yes we have tried, many times).  The trick with this room, as our friend Sarah explained, was getting a color that looked good but could also hold its own next to the very deep red of the living room walls.  And after looking at the results last night and this morning...so far so good.  The next step is to paint the trim above, which we started last night and hope to finish tonight.  After that we need to decide if we want to go ahead and do the bottom portion of the walls, since the white paint is somewhat faded and we already have the room prepared for painting anyway.  We'll see what happens on that front though, but in the meantime it's nice to at least have the major portion completed.  I'll see if I can post some photos in the next few days to show the before-and-after comparison.

Tuesday, May 15, 2012

Tearing down the wall(paper)

In an effort to hurry up and get this wallpaper project done, we have set a somewhat arbitrary deadline for ourselves of June 2.  That would mean it would be finished roughly six months from when we started, but there's about a five-months span in there that doesn't really count because of school, work, and taking care of our kid :)  But we're not big fans of starting household projects and then letting them sit in a perpetual state of flux, so we decided to buckle down and just get this job finished.  The wallpaper was taken down several months ago, followed by the removal of the wallpaper backing, which left bits and pieces of backing that were still stuck to the wall.  And that's where we started a few days ago--removing those bits with hot water, dish rags, and a big canvas dropcloth to catch everything.  Except for a few spots, it all came off pretty easily and now we are left with four nice off-white walls just waiting to be painted.

The final piece of the puzzle, though, is what to do with the few nicks and dings that the walls suffered throughout this whole process.  Nothing serious, mind you, but enough that we just want to make sure we proceed carefully. (This is, after all, our "formal" dining room. And we'd rather make sure we do things right the first time than try and fix it a year down the road.)  After checking with some friends who have much more experience in doing this sort of thing than we do, we decided to not sweat the details of covering these little nicks and dings up too much and just use some Kilz primer, along with some light spackling (we actually bought some spackle from Lowe's that is specifically designed for this kind of thing) and have a go at it.  Well, that's the plan anyway.

We have everything we need to start work on this final step, but we probably won't get to it for a few days. In the picture above you can see the white formerly-papered walls, the new color we will be painting them, and a couple tiny dings in the middle of the corner.  Hopefully when we're all done all that will be noticeable is the paint :)

Friday, May 11, 2012

Resetting and restarting

So here's the deal.  I used to update this blog several times a week, with general observations about positive or encouraging things I saw happening in my life.  But then, as so often happens with blogs like this, other things started crowding it out.  Work, graduate school, family...something's gotta give, right?  And sadly, it was this blog.  Much as I didn't like to see it happen, I realized that I just wasn't up to writing on it like I once was.  I have kept up a very active twitter account, but 140 characters is a far cry from actual blog posts.  And often, when I have thought about something that would make for an interesting blog post, I have been sidetracked by other events or, loathe as I am to admit it, just too lazy to write about it.

So I have been thinking about what I can do to keep the ol' blog going.  The major focus of my life right now is my family, and raising our son is far more important than writing on a blog.  But I don't want this blog to be just a journal about my kid--in fact, I want to keep things quite the opposite.  I would rather not have information about, and photos of, my kid put up publicly for the world to see.  We use other online tools to share these things with specific people, but since I don't know who exactly reads this blog I would rather not have my son's life chronicled for, potentially, all the world to read and see.

What I am going to try, though, is write posts about the things we (meaning me and my family) are doing to improve things around the house, yard, etc.  It might not be the most interesting stuff, but it's something I think I can latch on to and post about on a regular basis.  Like last night's project of working on removing wallpaper from one of our rooms:  it's something we have been working on for a while, and we hope to finish in the next few weeks.  I think it might make for an interesting post--the methods we are using, the tools we are trying, and the time it is taking.  There's also the swing we put up, the grass we're trying to grow, the new recipes we are trying...things like that would, I think, be a nice way for me to approach the blog that would make for somewhat interesting (and hopefully, somewhat regular) updates.  Maybe even a picture or two.  Who knows, eh?

And credit where credit is due...I kind of got the idea to do this from my friend Julie who, despite the many changes and upheavals in her life, has been using her blog as a way of sharing the things she is working on to keep busy as well as share her thoughts about things.  And so here's hoping for a bright future for The Brighter Side!