I figured that since it's been such a long time since I posted an update here on the ol' blog, I might as well explain why. It's not because I've lost interest--far from it! But a host of other things has consumed my time, and writing blog posts has not been my first choice of mental refuge when I do have spare time. And let's face it, like most people I actually do have plenty of spare time. It comes in the morning before I leave for work, or in the evening after our son goes to bed, or on the weekend when he's napping, or even when my wife is out running errands. Having time is not the issue, since I've got plenty of it. But how I choose to spend those minutes and hours, now that's the kicker. But I digress, and lest this post turn into a temporal treatise, I will simply close this thought by saying I'm still here, filling a tiny corner of the internet with whatever happens to come my way. God is good, and His blessings are many--should we only choose to see them. And I'm not going to stop posting about it any time soon.
However, in the past several months I have started doing a lot more photography and a lot less writing. I don't know if that's a good thing or not, but for now I'll just say it's a different thing. I'm learning to be creative in new ways, look for things I would never see before, and try to capture images I never thought I could. Not that I'm any good, mind you, but I have found something I really like doing in my off hours. To that end, I have been active in updating my Flickr account (especially now that Yahoo has actually updated Flickr!) and also taken on the challenge of posting one photo each week to a new site I set up called Weekly Fifty. The idea behind Weekly Fifty is to force me to get out and take pictures, and use the website as sort of an accountability tool to make sure I actually do it. And thus far it has worked quite well, as I have not missed a week since I created the site back in March. Lately I have started writing more in-depth descriptions of my photos, as a way to make sure I keep those word-generating muscles exercised too.
So what will happen to The Brighter Side? Nothing, really. What I'd like to do is find a way to get all my new posts on Weekly Fifty to show up here as well, and then still add new entries to this blog from time to time. For now I hope you'll follow my work on Weekly Fifty, and of course keep checking back here for updates as well.

A journal of positive thinking and uplifting commentary where the glory of God is revealed through the oft-overlooked majesty of the mundane.
Friday, July 19, 2013
Monday, February 04, 2013
A Lapse in Time
One kind of cool function on my Nikon D200 camera is something I almost never use: the built-in intervalometer. It's a setting that allows the camera to take pictures at specified intervals during a given time range. This is what people use to create time-lapse videos, and even though I tried my hand at this sort of thing last Spring I haven't really seen the need to do it again. That changed a few weeks ago, when my wife and I decided to bite the bullet and get a storm shelter installed in our garage. I thought it would be a fantastic opportunity to give the ol' intervalometer a whirl, and am fairly pleased with the results:
The video contains around 1800 pictures shot at 14-second intervals throughout the course of roughly eight hours. But this post isn't so much about the movie or the tornado shelter, but how I went about creating and editing the final video.
For starters, I knew I had a couple of issues to deal with up front. The first was the issue of power, or lack thereof. My camera battery lasts a while, but there is no way it would have done a shoot like this without losing power after an hour or two. At first I thought I would ask a coworker if I could borrow his battery pack, and he graciously consented. But shortly thereafter it hit me that even the mighty battery pack would only last three or four hours, which meant I was going to have to buy a power cord. Nikon sells one for $128, but I found an off-brand model on Amazon for about $25. If someone is doing these sorts of projects on a regular basis it would probably be wise to get the name-brand adapter since other companies can use substandard electronic components that might not be good for regular use, but for the occasional project it's probably fine.
Next up was the lens. Regular readers know I'm a huge fan of the 50mm f/1.8 lens, but it just wasn't going to cut theconcrete mustard on this project since the field of view on that lens is so narrow. I wanted a wide angle of view to capture all the installing action, which meant I needed a lens that could capture most of my garage from my camera's vantage point in the far back corner. Fortunately, another coworker had just the thing: a bare-bones no-nonsense 18-55mm kit lens. It was ideal for this type of photo shoot for a couple reasons:
• 18mm wide angle meant it could capture as much of the garage as I needed
• 3.5 maximum aperture would be fine since the photoshoot was outside in the daytime, which meant plenty of available light
• It's not incredibly expensive, so if it got broken or cracked by a piece of flying debris I could buy a replacement without breaking the bank.
With the power supply and the lens checked off my list, the only thing left to do was prepare for the photo shoot itself. I found a corner in the garage that was as far back and out of the way as possible, and spent a while playing around with various settings on the camera in order to facilitate an 8-hour shoot. Because the lighting conditions would change throughout the day I decided to let the camera control most of the exposure, but I wanted individual pictures to be clear enough to people would be able to discern what was happening. After some fiddling I arrived at the following settings:
• Lens zoomed out to 18mm, to capture as much of the garage as possible.
• Focus distance set manually to infinity. Autofocus would have been a mess, because the camera would have focused on all kinds of different things throughout the day. Manual focus ensured that every picture was focused exactly the same.
• Aperture opened to f/3.5, to let in as much light as possible given that the shoot would start before there was much daylight.
• Shutter speed set at 1/60, which would capture movement without much blur. In hindsight I could have set this a little slower, like 1/30.
• ISO set to 800. Normally I don't like going up to 800 because the D200 gets a little noisy, but I was trying to get the early morning pictures to be properly exposed.
• Matrix metering, since I needed a good overall exposure. I often use Spot metering if I want to make sure a certain point on the image (usually the focus point) is properly exposed, but Matrix metering basically looks at the entire photo when adjusting exposure rather than just one point. This would be much more useful given the nature of this photo shoot than Spot or Center-Weighted metering.
I shot in Shutter Priority mode, which meant the camera would be adjusting the aperture throughout the day in order to maintain proper exposure. That was preferable to setting one aperture and letting the camera adjust shutter speed, since I wanted to minimize blur in the photographs.
One other thing to consider is the interval for shooting, which involved a bit of math. The intervalometer on my D200 takes up to 999 photos per session, but I knew that would not be enough to document the entire day for a time-lapse shoot. I was also going to be at work most of the day, save for one hour when I usually come home for lunch, which meant that I could essentially break the shoot up into two four-hour sessions. At 14400 seconds per session, taking 999 pictures would mean 14.41 seconds between shots. Because of this, a 15-second interval would have been ideal, but since it was morning and I wasn't thinking clearly I set the interval for 14 seconds, which it turns out was enough to capture about 3 hours 53 minutes--just shy of four hours. Fortunately, I went home for lunch a tad early and was able to reset the intervalometer a few minutes after it hit 999 pictures, so I didn't really lose any shots. The guy doing the installation was also out dumping a load of dirt, so the shots I did miss weren't even important.
If you are setting up for your own time-lapse shoot, you might try this online time-lapse calculator. It will help you figure out which intervals to use and how many pictures to shoot given the constraints and conditions of your photo shoot.
Before I went back to work I reset the timer again, which resulted in a total of 2160 pictures taken throughout the entire day. I will be posting a tutorial of how I turned those into a 2.5-minute video in a few days, but suffice it to say it was much easier thanks to some of the innovations Apple introduced with FCPX compared to their previous offerings like Final Cut Pro 7 and Final Cut Express.
The video contains around 1800 pictures shot at 14-second intervals throughout the course of roughly eight hours. But this post isn't so much about the movie or the tornado shelter, but how I went about creating and editing the final video.
For starters, I knew I had a couple of issues to deal with up front. The first was the issue of power, or lack thereof. My camera battery lasts a while, but there is no way it would have done a shoot like this without losing power after an hour or two. At first I thought I would ask a coworker if I could borrow his battery pack, and he graciously consented. But shortly thereafter it hit me that even the mighty battery pack would only last three or four hours, which meant I was going to have to buy a power cord. Nikon sells one for $128, but I found an off-brand model on Amazon for about $25. If someone is doing these sorts of projects on a regular basis it would probably be wise to get the name-brand adapter since other companies can use substandard electronic components that might not be good for regular use, but for the occasional project it's probably fine.
Next up was the lens. Regular readers know I'm a huge fan of the 50mm f/1.8 lens, but it just wasn't going to cut the
• 18mm wide angle meant it could capture as much of the garage as I needed
• 3.5 maximum aperture would be fine since the photoshoot was outside in the daytime, which meant plenty of available light
• It's not incredibly expensive, so if it got broken or cracked by a piece of flying debris I could buy a replacement without breaking the bank.
 |
| Behold, the kit lens! Sometimes it's all you need to get the job done. |
• Lens zoomed out to 18mm, to capture as much of the garage as possible.
• Focus distance set manually to infinity. Autofocus would have been a mess, because the camera would have focused on all kinds of different things throughout the day. Manual focus ensured that every picture was focused exactly the same.
• Aperture opened to f/3.5, to let in as much light as possible given that the shoot would start before there was much daylight.
• Shutter speed set at 1/60, which would capture movement without much blur. In hindsight I could have set this a little slower, like 1/30.
• ISO set to 800. Normally I don't like going up to 800 because the D200 gets a little noisy, but I was trying to get the early morning pictures to be properly exposed.
• Matrix metering, since I needed a good overall exposure. I often use Spot metering if I want to make sure a certain point on the image (usually the focus point) is properly exposed, but Matrix metering basically looks at the entire photo when adjusting exposure rather than just one point. This would be much more useful given the nature of this photo shoot than Spot or Center-Weighted metering.
I shot in Shutter Priority mode, which meant the camera would be adjusting the aperture throughout the day in order to maintain proper exposure. That was preferable to setting one aperture and letting the camera adjust shutter speed, since I wanted to minimize blur in the photographs.
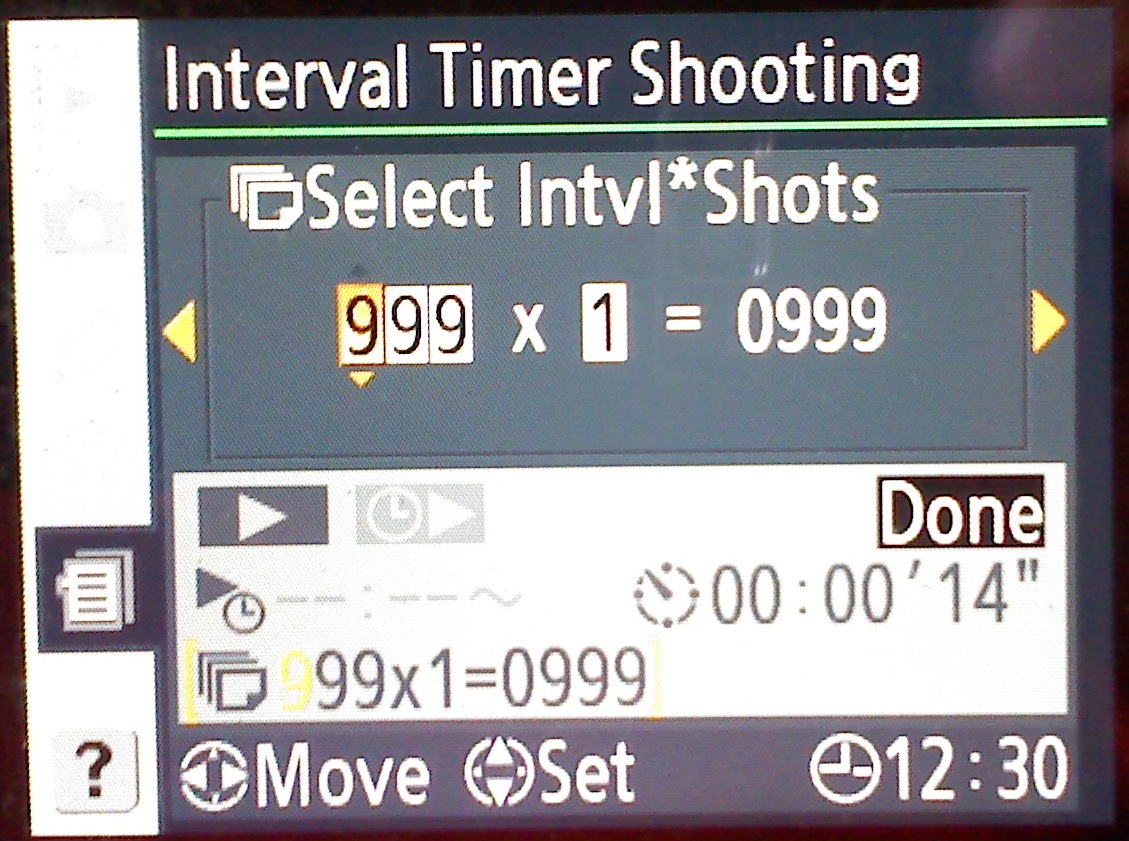 |
| Setting the intervalometer on my Nikon D200 |
If you are setting up for your own time-lapse shoot, you might try this online time-lapse calculator. It will help you figure out which intervals to use and how many pictures to shoot given the constraints and conditions of your photo shoot.
Before I went back to work I reset the timer again, which resulted in a total of 2160 pictures taken throughout the entire day. I will be posting a tutorial of how I turned those into a 2.5-minute video in a few days, but suffice it to say it was much easier thanks to some of the innovations Apple introduced with FCPX compared to their previous offerings like Final Cut Pro 7 and Final Cut Express.
Wednesday, January 23, 2013
It's called oil, and it gets a little slick
Changing the oil in your vehicle is one of the easiest maintenance procedures a car owner can perform, and also one of the most important. While most people take their cars in to a shop and have a mechanic do it, this procedure is simple enough that most people can do it at home in their own driveway. But unless you know what you are doing the prospect of changing the oil can seem a bit daunting. There are also a few tools you need to do the job properly, and without those it might seem well-nigh incomprehensible as far as how to actually get the old oil out and the new stuff put in. But fear not! When I changed the oil in our 1998 Corolla this past weekend I used the opportunity to take plenty of pictures with the goal of putting together a little tutorial on how exactly to do this kind of thing.
So why should you bother changing the oil in your car when you can drive to a shop and have someone do it for $30? I'm not saying that method is bad, but doing it yourself has some benefits. First of all you can choose the kind of oil and filter you use, whereas the shop down the street might be using low-grade materials that are designed to be cheap but not necessarily the best for your vehicle. Using higher-quality materials can help your car run better and last longer. Doing it yourself can also be a great way to save money, as the price for a few quarts of oil and a filter is often much less than what a shop charges to change the oil. (Check the ads too. Most auto parts stores run regular sales in which you can get oil and a filter for a discount when purchased together.) Finally, learning how to change the oil in your car is a fantastic way to educate yourself about how your vehicle works, and help demystify some of the mechanical aspects of an automobile that might seem strange and incomprehensible. Learning to do basic auto maintenance like this doesn't take a lot of time and isn't very complicated, and can be a great gateway drug too: pretty soon you might find yourself with enough confidence to tackle changing the air filter, battery, tires, muffler...the sky's the limit!
To change the oil you'll need a couple of things before you get started:
• Oil. I use Quaker State or Castrol, but anything is fine as long as it's not the cheapest possible. All oil has to meet minimum standards of quality, but some brands have additives and detergents that help them lubricate better and last longer. The cheapest possible oil isn't necessarily bad, but it's not going to be the best either.
• Filter. I like Purolator filters, but anything is fine as long as it's not a Fram. They used to be great, but have declined significantly in quality recently. If you are unsure, just go to your local auto parts store and ask the guy at the counter what he recommends.

• Ratcheting Wrench for removing the drain plug and possibly the old filter. If you don't have one, I recommend buying a socket set since it will have the wrench along with any sockets you would need.
• Socket the same size as the drain plug. A 14mm socket is probably what you need, but there's no telling until you are actually underneath your vehicle.

• Socket wrench extension if you need to use the filter wrench. This comes standard in just about every socket set.
• End Cap Oil Filter wrench if your filter is stuck on really tight. These are a couple bucks at any auto parts store.

• Tub for holding the oil.

• Ramps to get your car off the ground, unless you have a pickup or SUV that is already high enough for you to get under it and work. A jack and jack stands will work too, but they are a little more cumbersome and expensive than buying ramps.
• Paper towels to clean up any spills.
The first thing to do is get your car elevated. I use a set of Rhino Ramps I've had for years, and they work great for this kind of project. It can help to have a spotter tell you when your car is at the top of the ramp, but if you're by yourself that's fine too. Just drive up smooth and steady, and hit the brake when you feel the car plateau at the top of the ramps. Avoid short bursts on the gas pedal, since your car will lurch forward and could fly off the end of the ramps if you're not careful.

The next step is to locate two key objects underneath your car: the oil filter and the oil drain plug. The former is a cylinder that is about the size of a pop can, but maybe half as tall. The latter is probably in the middle of your car on one end of the oil pan, or basically the bottom of your engine.

 These two things are critical, and if you can't find them a quick internet search should help you identify their location on your particular vehicle.
The next thing to do is remove the drain plug, but make sure your oil tub is in place or you will get oil all over your garage floor. Use your ratcheting wrench and socket to get the plug out, and the oil will immediately start flowing into the tub. It's a bit tricky to do this without getting oil on your hands, so just be prepared with some paper towels standing by. Also, if you have recently driven your car the oil might be hot so I usually don't drain the oil until my vehicle has been sitting for an hour or two.

 Once the oil is draining it's time to get the filter off. It shouldn't be on all that tight, and you might be able to get it off with just your hand. If not, you will need to use the end cap filter wrench to wrest the filter from its post like so:
 There will be some oil draining out from where the filter was attached, so make sure the tub is positioned such that it can catch both sources of oil: the drain plug and the filter.
After the oil is finished draining, it's time to put everything back together. First you will need to clean the post where the filter attaches. Use a paper towel or rag to wipe off any excess oil from the metal ring around the filter post before screwing on the new one.
 You're just about ready to attach the new filter, but before you do take a bit of oil from one of the new quarts and put a thin bead around the rubber gasket on the filter. My dad taught me to do this years ago, and he claims it helps create a better seal. I'm not sure if it does or not, but on things like this I figure it doesn't hurt so why not do it? Just dip your finger in one of the quarts of oil and smear it on, and remember that you don't need very much. A very thin bead is all you need.
 Now it's time to screw the filter on to the post. Just grab it in your hand, reach up to where you removed the old filter, and screw it on. Tightening by hand is plenty sufficient to get a good seal, and you will certainly not need the end cap wrench here. In fact, too much tightening could damage the filter so just get it on good and tight by hand and you'll be set.
After the filter is on, the next step is to put the drain plug back in. Wipe off any excess oil and make sure the gasket around the plug is intact and free of cracks. If there are cracks, you might want to get a replacement gasket from an auto parts store where you can find a package with several in it for a couple bucks. Don't put the plug in too tight either, or you could damage the threads where it screws in. Just give it a good snug tightening with your ratcheting wrench and you can be on your way.


Now you've got the drain plug and filter in place, so the only thing left is to add oil. If you have never opened up the hood of your car, don't worry. It might look scary but there's only one thing you need to look for, which is the oil fill hole where you actually put oil into your engine.

The exact spot of this hole is different on every car, but you should be able to see a cap with some information about the type of oil your vehicle requires. Our Corolla takes 5W-30, and if you are not sure check the owner's manual or call a local auto dealer. The manual will also tell you how much oil to add, which is critical: too little or too much and you could easily cause premature wear and damage to your engine! Don't guess on this step--find out exactly what kind of oil your vehicle needs, and how much, or you're doing more harm than good.
To fill the oil, remove the cap and just start pouring. Most oil quarts are lopsided on top with a long neck, which allows you to pour them easily without spilling. If you do get a bit of oil on the engine, don't worry. Wipe it up if you can and then just go about your business--it won't damage anything if you get a bit of oil on your engine instead of in it.
 And....that's it! You're all done changing the oil in your car. Give yourself a pat on the back, fire up the engine, and listen to it purr knowing that you personally have given your vehicle a new lease on life.
Of course that leaves just one problem: the old motor oil sitting in the tub. You can't use it for cooking and you can't put it back in your engine, so what do you do? Whatever happens, don't dump it out or pour it down the drain. That's bad on many, many levels. Instead, pour it into a milk jug and take it in to an auto parts shop to be recycled.
 You might need a funnel for this step, but if you are careful you can pour it by hand too. And when you take it in, it is literally recycled and used again either as engine oil, heating oil, or who knows what else. But it is the best and cleanest way to dispose of your old motor oil. There might be some left in the tub after you are done, and if so just let it drain into a small container and then dump it into the jug.
 This entire process can take as little as 20 minutes once you get the hang of it, and depending on how much you want to let the oil drain out of your car. There is an old adage that you should change the oil in your car every 3,000 miles, but this is one of those old misconceptions that refuses to die. Most modern vehicles can go at least 5,000 miles between oil changes but like my dad says it doesn't hurt to do it more often than that. Check your owner's manual for a recommended mileage between changes, but it wouldn't hurt to call a local dealer and see what they recommend too. Climate and driving conditions can impact how often the oil should be changed, and the locals might have a better recommendation for you than a generic number from the manual.
So why should you bother changing the oil in your car when you can drive to a shop and have someone do it for $30? I'm not saying that method is bad, but doing it yourself has some benefits. First of all you can choose the kind of oil and filter you use, whereas the shop down the street might be using low-grade materials that are designed to be cheap but not necessarily the best for your vehicle. Using higher-quality materials can help your car run better and last longer. Doing it yourself can also be a great way to save money, as the price for a few quarts of oil and a filter is often much less than what a shop charges to change the oil. (Check the ads too. Most auto parts stores run regular sales in which you can get oil and a filter for a discount when purchased together.) Finally, learning how to change the oil in your car is a fantastic way to educate yourself about how your vehicle works, and help demystify some of the mechanical aspects of an automobile that might seem strange and incomprehensible. Learning to do basic auto maintenance like this doesn't take a lot of time and isn't very complicated, and can be a great gateway drug too: pretty soon you might find yourself with enough confidence to tackle changing the air filter, battery, tires, muffler...the sky's the limit!
To change the oil you'll need a couple of things before you get started:
• Oil. I use Quaker State or Castrol, but anything is fine as long as it's not the cheapest possible. All oil has to meet minimum standards of quality, but some brands have additives and detergents that help them lubricate better and last longer. The cheapest possible oil isn't necessarily bad, but it's not going to be the best either.
• Filter. I like Purolator filters, but anything is fine as long as it's not a Fram. They used to be great, but have declined significantly in quality recently. If you are unsure, just go to your local auto parts store and ask the guy at the counter what he recommends.

• Ratcheting Wrench for removing the drain plug and possibly the old filter. If you don't have one, I recommend buying a socket set since it will have the wrench along with any sockets you would need.
• Socket the same size as the drain plug. A 14mm socket is probably what you need, but there's no telling until you are actually underneath your vehicle.

• End Cap Oil Filter wrench if your filter is stuck on really tight. These are a couple bucks at any auto parts store.

• Tub for holding the oil.

• Ramps to get your car off the ground, unless you have a pickup or SUV that is already high enough for you to get under it and work. A jack and jack stands will work too, but they are a little more cumbersome and expensive than buying ramps.
• Paper towels to clean up any spills.
 |
| C'mon, it's paper towels. Do you really need a picture? :) |

The next step is to locate two key objects underneath your car: the oil filter and the oil drain plug. The former is a cylinder that is about the size of a pop can, but maybe half as tall. The latter is probably in the middle of your car on one end of the oil pan, or basically the bottom of your engine.


The next thing to do is remove the drain plug, but make sure your oil tub is in place or you will get oil all over your garage floor. Use your ratcheting wrench and socket to get the plug out, and the oil will immediately start flowing into the tub. It's a bit tricky to do this without getting oil on your hands, so just be prepared with some paper towels standing by. Also, if you have recently driven your car the oil might be hot so I usually don't drain the oil until my vehicle has been sitting for an hour or two.

After the plug is off, it takes at least 10 minutes for the oil to drain but if you have spare time, it never hurts to let it go longer. My dad used to let the oil drain for a couple of hours to ensure that every last drop of the old oil was gone. This probably isn't absolutely necessary, but the moral of the story here is that the longer you can let the oil drain out the better it will be for your car.


After the oil is finished draining, it's time to put everything back together. First you will need to clean the post where the filter attaches. Use a paper towel or rag to wipe off any excess oil from the metal ring around the filter post before screwing on the new one.


After the filter is on, the next step is to put the drain plug back in. Wipe off any excess oil and make sure the gasket around the plug is intact and free of cracks. If there are cracks, you might want to get a replacement gasket from an auto parts store where you can find a package with several in it for a couple bucks. Don't put the plug in too tight either, or you could damage the threads where it screws in. Just give it a good snug tightening with your ratcheting wrench and you can be on your way.


The exact spot of this hole is different on every car, but you should be able to see a cap with some information about the type of oil your vehicle requires. Our Corolla takes 5W-30, and if you are not sure check the owner's manual or call a local auto dealer. The manual will also tell you how much oil to add, which is critical: too little or too much and you could easily cause premature wear and damage to your engine! Don't guess on this step--find out exactly what kind of oil your vehicle needs, and how much, or you're doing more harm than good.
To fill the oil, remove the cap and just start pouring. Most oil quarts are lopsided on top with a long neck, which allows you to pour them easily without spilling. If you do get a bit of oil on the engine, don't worry. Wipe it up if you can and then just go about your business--it won't damage anything if you get a bit of oil on your engine instead of in it.

Of course that leaves just one problem: the old motor oil sitting in the tub. You can't use it for cooking and you can't put it back in your engine, so what do you do? Whatever happens, don't dump it out or pour it down the drain. That's bad on many, many levels. Instead, pour it into a milk jug and take it in to an auto parts shop to be recycled.


Tuesday, January 15, 2013
Shutter Speed Explained
Let me be clear: I am not a photography expert. I'm not even a photographer. I'm just a dude with a camera who likes to learn stuff. I don't know much about photography or taking pictures, but I like to try out new things and see what happens. I also enjoy teaching, and since one of the best ways to learn a subject is to teach it, I figured it would be cool to write some blog posts about photography as a way of helping others learn while at the same time advancing my own skills as well. I have already covered, to some extent, depth of field and aperture, and this post will be about shutter speed with hopefully another post to follow about ISO. Since this article builds on concepts discussed in those articles, I would advise you to give them a look-see before reading further. And if you're not the reading type, here's a video I made that kind of explains things too:
As one of the three components of the holy trinity of photography, shutter speed is an essential element to understand if you want to dig into photography a little deeper. In photography, a camera's shutter functions the same way as your eyelids do: when your eyelids are open, light comes in. When your eyelids are closed, no light comes in. This analogy doesn't carry a whole lot of weight though, because on a camera the eyelid, or shutter, is almost always closed (unless you are actually taking a picture). But on your eyes the eyelid, or shutter, is almost always open (unless you blink or go to sleep). Still, it's not entirely dissimilar and hopefully thinking about the shutter as an eyelid for your camera will help you understand what it does and why it's important to control it.
A digital camera works by allowing light to pass through a camera's lens and on to an image sensor, and exactly how much light is let in is determined by the aperture and the shutter speed. Think of a swimming pool with a plug in the side:
 Let's say you want to drain ten gallons of water. You have two choices:
1. Use a small plug but leave it open for a long time
2. Use a large plug but leave it open for a short time
Both solutions will yield the same result, and the same principle holds true for photography. The amount of light hitting the image sensor is like the amount of water you let out of the pool. To let in enough light to take a proper photo, you have a couple of choices:
1. Use a small aperture but leave the shutter open for a long time
2. Use a large aperture but leave it open for a short time
Another option is to use a higher or lower ISO, but we'll tackle that issue another time (for now, if you aren't sure what to do just leave your camera Auto ISO, or else use 200 for outdoors and 400-800 for indoors). Shutter speed does not work on its own--it have to work in conjunction with other settings on your camera like the aperture size. But understanding how to properly use the shutter will help bring you one step closer to mastering your camera. Whee!
Let's use a couple of case studies to help explain shutter speed. Say your kids are playing outside and you want to get good pictures of them on the swings, playing ball, or just running around. There is plenty of light to work with since it's a sunny day, so in order to take your pictures you have the same two options as before. However, since your kids are running around and making a great deal of movement, if you leave the shutter open for too long they will get blurry:
In the above photo, the shutter was left open for one-tenth of a second. While that might not seem like much time, it is actually way too long if your goal is to capture your kids clearly in the middle of doing something. In the above photo, the one-tenth second shutter speed was used intentionally to create a pleasing artistic effect, but if your kid is kicking a soccer ball around or flying high on a swing, chances are you would rather have a clear picture without any blur. In this case, a much faster shutter speed would be advisable. But how fast? That's up to you to decide, and every situation will be different. A setting of one-two-hundredth (1/200) of a second would probably work, but most cameras today can go as fast as one-four-thousandth (1/4000) or one-eight-thousandth (1/8000) of a second--enough to capture even the fastest motion without any blur:
In the above photo there is no blur at all, even though the girl is clearly moving fast. The photographer used a very fast shutter speed in order to freeze the action, and was likely shooting with a DSLR camera because they tend to focus much quicker than point-and-shoot pocket cameras (and a quick focusing time is necessary, because the girl is moving so fast!).
But what about the aperture? Let's go back to the swimming pool analogy for a bit. On a bright sunny day there is plenty of light available, so you can use a large aperture for a small depth of field (if you want to focus just on one kid) or a small aperture for a large depth of field (if you want to focus on all the kids). Either way there will be plenty of light coming through to the sensor to make for a good picture.
But what if there isn't enough light? How about another case study to illustrate this.
Say you are out for a walk in the evening and want to snap a few pictures of your family. The sun is about to set, so there just isn't a whole lot of light available (i.e. the swimming pool from my earlier example is really low). In order to let enough light in to take a photo, you still have the same two options as before but the problem is that even a larger aperture like f/2.8 might not let in enough light for the picture to turn out. The only solution here (for our purposes, anyway--there are other solutions but they are a bit too complicate for this just-the-basics tutorial) is to use a longer shutter speed. This will allow enough light to pass through the lens and on to the image sensor, but the catch is you will have to tell your family to hold very still. When leaving the shutter open for a longer period of time, like one-half of a second, any movement at all will result in a blurry photo. This also means you will have to hold the camera very still too, and possibly even use a tripod. Of course you could always use a flash, but that might result in harsh light on your family and undesirable shadows too.
Leaving the shutter open for a much longer period of time, like one, five, ten, or more seconds can also produce some interesting and artistic results such as this:
If you want to try your hand at a similar type of photograph, simply put your camera on a tripod, point it at a busy street at night, and keep the shutter open for several seconds. Some cameras even have a "Bulb" mode which allows the shutter to stay open for as long as you want! This is really cool for taking pictures of stars moving across the sky or capturing lightning as it comes in with a springtime thunderstorm.
But what about one of the most basic questions: how on earth do you set your camera's shutter speed? On most pocket cameras, you can't. This is left up to the computer inside the camera, but if your camera has a dial that says "M A S P" or "M Av Tv P" you're in luck! All DSLR cameras have these options, and some pocket cameras do too.
M = Manual. You have full control over the aperture and shutter values.
A/Av = Aperture mode. You control the aperture of your lens, and the camera determines the appropriate shutter speed.
S/Tv = Shutter mode. You control the shutter speed, and the camera determines the appropriate aperture setting.
P = Program auto. The camera determines what it thinks are the best aperture and shutter values.
Turn the dial of your camera to S/Tv, and you will have the option to set the shutter speed, while letting your camera choose the best aperture. (If you are feeling brave, go ahead and use Manual mode in which you set both the aperture and the shutter speed.) Just remember that there is no one correct shutter value to use in any given situation. It's up to you to decide what to use, give the kind of photo you want to take. A word of warning though: The standard "Kit" lens that comes with most DSLR cameras won't let in enough light to take good pictures with a fast shutter speed in low-light situations like indoors or at night. So if you are trying this out for the first time, make sure you are outside or in a situation with plenty of available light. Once you feel comfortable setting the shutter speed on your own, you can start taking photos indoors or with less available light and you will have a better idea of what speed to use given the photos you are taking.
As I have said many times on this blog, I shoot with a 50mm f/1.8 lens which means that even on fast shutter speeds it lets in enough light to take decent pictures. I like to take pictures of my son, and since it's winter and we spend a lot of time indoors, I need to have a shutter speed that is fast enough to eliminate the blur of his movements but slow enough to let in enough light. As a result, I shoot most of the pictures of him using a shutter speed of 1/60, and let the camera figure out the appropriate aperture (which usually ends up being around f/2.8 or f/1.8 especially in the morning or evening when there just isn't much light to work with). Since I shoot in RAW it's easy to lighten up the photo afterwards, but even RAW files have their limits and there really is no substitute for a properly exposed photograph. Any slower than 1/60 (such as 1/45, or 1/30) generally results in too much blur since my 18-month-old son tends to move around a lot, but any faster than 1/60 (such as 1/90) and the lens simply can't let enough light in to take a good picture. Most pocket cameras have image sensors and lenses that are so small they need to use a flash in order to take good pictures in low light, but it's certainly worth experimenting on the manual controls to see what results you can achieve.
So there you go! I hope you learned something, and if you have questions just leave me a comment and I will do my best to answer. Remember that the most important rule is to get out there and just start taking pictures!
As one of the three components of the holy trinity of photography, shutter speed is an essential element to understand if you want to dig into photography a little deeper. In photography, a camera's shutter functions the same way as your eyelids do: when your eyelids are open, light comes in. When your eyelids are closed, no light comes in. This analogy doesn't carry a whole lot of weight though, because on a camera the eyelid, or shutter, is almost always closed (unless you are actually taking a picture). But on your eyes the eyelid, or shutter, is almost always open (unless you blink or go to sleep). Still, it's not entirely dissimilar and hopefully thinking about the shutter as an eyelid for your camera will help you understand what it does and why it's important to control it.
A digital camera works by allowing light to pass through a camera's lens and on to an image sensor, and exactly how much light is let in is determined by the aperture and the shutter speed. Think of a swimming pool with a plug in the side:

1. Use a small plug but leave it open for a long time
2. Use a large plug but leave it open for a short time
Both solutions will yield the same result, and the same principle holds true for photography. The amount of light hitting the image sensor is like the amount of water you let out of the pool. To let in enough light to take a proper photo, you have a couple of choices:
1. Use a small aperture but leave the shutter open for a long time
2. Use a large aperture but leave it open for a short time
Another option is to use a higher or lower ISO, but we'll tackle that issue another time (for now, if you aren't sure what to do just leave your camera Auto ISO, or else use 200 for outdoors and 400-800 for indoors). Shutter speed does not work on its own--it have to work in conjunction with other settings on your camera like the aperture size. But understanding how to properly use the shutter will help bring you one step closer to mastering your camera. Whee!
Let's use a couple of case studies to help explain shutter speed. Say your kids are playing outside and you want to get good pictures of them on the swings, playing ball, or just running around. There is plenty of light to work with since it's a sunny day, so in order to take your pictures you have the same two options as before. However, since your kids are running around and making a great deal of movement, if you leave the shutter open for too long they will get blurry:
 |
| The couple stood very still while their kids ran around. Image courtesy of Flickr user Steve Bremer. Used with permission. |
 |
| Image courtesy of Overcoming Busy. Used with permission. |
But what about the aperture? Let's go back to the swimming pool analogy for a bit. On a bright sunny day there is plenty of light available, so you can use a large aperture for a small depth of field (if you want to focus just on one kid) or a small aperture for a large depth of field (if you want to focus on all the kids). Either way there will be plenty of light coming through to the sensor to make for a good picture.
But what if there isn't enough light? How about another case study to illustrate this.
Say you are out for a walk in the evening and want to snap a few pictures of your family. The sun is about to set, so there just isn't a whole lot of light available (i.e. the swimming pool from my earlier example is really low). In order to let enough light in to take a photo, you still have the same two options as before but the problem is that even a larger aperture like f/2.8 might not let in enough light for the picture to turn out. The only solution here (for our purposes, anyway--there are other solutions but they are a bit too complicate for this just-the-basics tutorial) is to use a longer shutter speed. This will allow enough light to pass through the lens and on to the image sensor, but the catch is you will have to tell your family to hold very still. When leaving the shutter open for a longer period of time, like one-half of a second, any movement at all will result in a blurry photo. This also means you will have to hold the camera very still too, and possibly even use a tripod. Of course you could always use a flash, but that might result in harsh light on your family and undesirable shadows too.
Leaving the shutter open for a much longer period of time, like one, five, ten, or more seconds can also produce some interesting and artistic results such as this:
 |
| Image courtesy of Reddit user heisakukosawa. Used with permission. |
But what about one of the most basic questions: how on earth do you set your camera's shutter speed? On most pocket cameras, you can't. This is left up to the computer inside the camera, but if your camera has a dial that says "M A S P" or "M Av Tv P" you're in luck! All DSLR cameras have these options, and some pocket cameras do too.
M = Manual. You have full control over the aperture and shutter values.
A/Av = Aperture mode. You control the aperture of your lens, and the camera determines the appropriate shutter speed.
S/Tv = Shutter mode. You control the shutter speed, and the camera determines the appropriate aperture setting.
P = Program auto. The camera determines what it thinks are the best aperture and shutter values.
Turn the dial of your camera to S/Tv, and you will have the option to set the shutter speed, while letting your camera choose the best aperture. (If you are feeling brave, go ahead and use Manual mode in which you set both the aperture and the shutter speed.) Just remember that there is no one correct shutter value to use in any given situation. It's up to you to decide what to use, give the kind of photo you want to take. A word of warning though: The standard "Kit" lens that comes with most DSLR cameras won't let in enough light to take good pictures with a fast shutter speed in low-light situations like indoors or at night. So if you are trying this out for the first time, make sure you are outside or in a situation with plenty of available light. Once you feel comfortable setting the shutter speed on your own, you can start taking photos indoors or with less available light and you will have a better idea of what speed to use given the photos you are taking.
As I have said many times on this blog, I shoot with a 50mm f/1.8 lens which means that even on fast shutter speeds it lets in enough light to take decent pictures. I like to take pictures of my son, and since it's winter and we spend a lot of time indoors, I need to have a shutter speed that is fast enough to eliminate the blur of his movements but slow enough to let in enough light. As a result, I shoot most of the pictures of him using a shutter speed of 1/60, and let the camera figure out the appropriate aperture (which usually ends up being around f/2.8 or f/1.8 especially in the morning or evening when there just isn't much light to work with). Since I shoot in RAW it's easy to lighten up the photo afterwards, but even RAW files have their limits and there really is no substitute for a properly exposed photograph. Any slower than 1/60 (such as 1/45, or 1/30) generally results in too much blur since my 18-month-old son tends to move around a lot, but any faster than 1/60 (such as 1/90) and the lens simply can't let enough light in to take a good picture. Most pocket cameras have image sensors and lenses that are so small they need to use a flash in order to take good pictures in low light, but it's certainly worth experimenting on the manual controls to see what results you can achieve.
So there you go! I hope you learned something, and if you have questions just leave me a comment and I will do my best to answer. Remember that the most important rule is to get out there and just start taking pictures!
Tuesday, January 08, 2013
Yoga attic crawling
It didn't take long after my most recent failed attempt at resuscitating our bathroom heat/vent/light (HVL) appliance until my wife and I decided to just put in a new unit altogether. We had exhausted (har!) all avenues of repair available to us, and the fan was only getting worse so last Saturday we trekked off to the bathroom aisle at Lowe's and stood gaping at the lights and fixtures on display like some sort of Martha Stewart-inspired rock climbing wall. We really didn't know where to start, but thankfully the salesdude on duty was fairly knowledgeable and was able to answer most, if not all, of our questions to our satisfaction. After some deliberation we decided on a Broan 100HL which was a little more expensive than we were hoping for, but one of only two models in stock that actually had a heating element. Since this was one of our purchasing criteria, and since the cheaper version was pretty wimpy for our master bathroom, we bit the bullet and got the mamma jamma one instead. Normally we like to shop around when making purchases, and we knew we could get the same unit on Amazon for about 25% less, but in this case we decided it was worth it to buy from a store in town so we could get help if we needed or return it if it was broken. We also didn't want to wait for it to be shipped to us, because we were hoping to take care of the installation that same day. We were really itching to ditch the old unit and get a functioning model put in right away :)


 |
| This thing is so old, Carson originally installed it in Lord Grantham's bathroom. |
I knew, for the most part, what the installation would involve and wasn't all that concerned. In this order, here's what would need to happen:
0. Flip circuit breaker off (this is step zero because it kind of goes without saying)
1. Un-wire existing unit
2. Remove existing unit
3. Cut ceiling drywall, if necessary, to make room for new unit
4. Install new unit
5. Wire new unit
I honestly didn't think it would be all that difficult, especially since I had some experience with this kind of thing after putting in a ceiling fan with my dad a year ago. I knew my way around the attic and I had a general idea of what would need to happen with the new unit so I thought I could get everything done in one day--hopefully while our son was napping. What I forgot to pay heed to was that "Everything went according to plan" is a phrase that has not been uttered by an amateur handyman since the invention of the hammer.
The first thing when doing any project like this, as my dad taught me years ago, is to say a prayer. So I did, and even though not everything worked out how I hoped it would there were many times during the replacement process that I was sure I felt guidance and peace from the Lord. After closing with a hearty "Amen" I made sure I had all the necessary tools, but since I wasn't sure exactly what all I would need I just brought in a bunch of stuff from the garage:
The first thing when doing any project like this, as my dad taught me years ago, is to say a prayer. So I did, and even though not everything worked out how I hoped it would there were many times during the replacement process that I was sure I felt guidance and peace from the Lord. After closing with a hearty "Amen" I made sure I had all the necessary tools, but since I wasn't sure exactly what all I would need I just brought in a bunch of stuff from the garage:
 |
| New HVL unit, drill bits, socket set, hammer, drill, old shoes, extension cord. Not pictured: halogen light, mag-light, rulers, pencils, and face mask because breathing in attic insulation is no fun. |
I ended up using a lot more than this, but it was a good starting point. And of course any project like this requires some amount of liquid sustenance as well:
 |
| One of the most important tools of the trade |
Just so we're all on the same page, here's the inside of the existing HVL unit:

On the right is the squirrel cage fan that I cleaned out and lubricated a few days prior but continued to defy me by rattling around like a crippled hampster on a rusty wheel. On the left is the heating unit, which has always worked pretty well but probably not as good as it did back in its youthful carefree days several decades ago. Taking the thing apart was fairly simple, and one of the easiest parts of the entire operation thanks to the discrete assembly nature of the overall package. The heater, vent, and light were each plugged in to what was basically their own mini-outlets inside of the box:

To remove each individual component all I had to do was un-screw them from their mountings and unplug them from the box. After that I was left with nothing but a metal housing in the ceiling with some wires hanging out:

On these HVL units there are two sets of wires: one for the heater and one for the fan and light. I grabbed some tape and labeled the wires so I would know which was which when installing the new unit:

The next step was to remove the entire metal housing, which basically just involved taking out a few support screws. When that was done I had a big ol' gaping hole in our bathroom that led right into the attic, and then it was time to start installing the new unit. Unfortunately, this is where things went south real quick and I stopped taking pictures since I was more concerned with getting the job done than documenting the process. Thus, I hope verbal descriptions will suffice :)
After the box was removed I climbed up into the attic through the entry point in the bathroom closet--the same method I used for my rafter repair job in July. Right away I could tell that this job would be more complicated than the rafter work due to a number of factors:
1. The HVL unit was situated near the edge of the house, which gave me about 1 to 3 feet of vertical space in which to work. It was gonna be super duper cramped, and like some twisted form of a child's game, you can only step on the rafters when working in the attic. One wrong move and you can put your foot through the ceiling. A yoga instructor would probably have had a difficult time, and I am no yoga instructor.
2. There was a heating duct running right on top of the HVL unit. This was going to be tricky to maneuver around. Side note: do not apply pressure to a heating duct. It will collapse and you will be sorry.
3. The new HVL unit needed cross braces to support it between the rafters. I was going to have to put these in by myself. Somehow.
4. The old HVL unit had two sets of White/Black/Ground wires coming from the three-way switch in the bathroom. The new HVL unit required one White/Black/Ground for the heater and one White/Black/Red/Ground for the vent and light. I was going to have to do some re-wiring.
5. No way was I going to get this all done while my son was napping.
Like any linear first-person-shooter though, the best thing to do when faced with a series of obstacles is ti just start going and tackle everything one by one. So I took a deep breath and got cracking. I cut out the hole in the ceiling a bit more to accommodate the longer metal housing of the new unit, which was a few inches longer than the old one. Here's what our bathroom looked like after this segment of what was quickly turning into an episode of Tool Time:

Then I went back into the attic and screwed in two support braces between the rafters that the new unit would be attached to. After this was done my wife stood on the stepstool and held the new unit in place while I was in the attic working on securing things...and we hit another snag. Things were not lining up properly and we were going to have to make more room for the new unit than I had originally planned. To do this the opening would need to be cut longer and the support braces would have to be moved. No big deal, right? Sure, unless the screws used to secure the support braces get stripped out and can't be removed. Which is, coincidentally, exactly what happened. (Though only on a couple places. Fortunately I used heavy-duty hex-head screws in a few spots, and those came right out). So we went back to Lowe's and got a screw removal tool, a new three-way switch, and 25 feet of White/Black/Red/Ground wiring. Back at home and up to the attic I went, only to find that the screw removal tool only sort of worked. At this point I used the tried-and-true method of banging on things with a big ol' hammer, and sure enough the support struts eventually came loose. Woohoo! You can kind of see how this worked in the picture below, which I took by popping up like a whack-a-mole through the hole that was cut in the ceiling.
 |
We were now about four hours into the project and nowhere near finished, but it's amazing what can be accomplished with a supportive wife and a portable crib for one's child :) I climbed back up to the roof while my wife held the new HVL unit in place, extended the metal brackets on the unit, attached the support braces, and nailed the brackets into place. This whole process took about 30 minutes during which time my wife's shoulders weren't exactly having a field day and our son was busy dismantling the components of his portable crib. But we finally got everything up up which meant that the worst was over and it was time for dinner and then cleanup. Even though the new unit was not wired up, it was in the ceiling and ready to go.
The next day after our son was down for his nap I set about tackling Part Two: The Wiring. Basically I had to turn this into a functional switch:

The first thing to do was track down the wiring for the existing HVL unit, which was buried under six inches of blown attic insulation, and get it the heck out of there. Of the two sets of wires going up to the unit, only one would need to be replaced because the standard White/Black/Ground could be re-used for the heater portion. Back up in the attic I found the wire leading to the vent and light, cut it open, and spliced it with the new wire from Lowe's by looping the ground wires around each other and then duct-taping the whole thing up tight. This allowed my wife to pull the old wire out from the switch box while I fed in new wire through a tiny hole in the attic. Soon we had the new wiring in place, and I crawled back to the new HVL unit and hooked all the wires up to the box itself. Then I went back down, wired up the new three-way switch, sent my wife to flip on the circuit breaker, and...nothing. Well, not for the light and fan anyway. The heater worked but the other two were dead as a doornail.
Way bummer.
This was probably the worst part of the entire process because everything was, in theory, all hooked up properly. The old unit was out, the new one was in place, and the wires were hooked up right. I double- and triple-checked the wiring, but nary a fault was found. Everything was in place, but it just didn't work. I was seriously annoyed, and I'm generally the kind of guy who doesn't get annoyed easily. My wife was taking it pretty well though, and she calmly walked me through all the steps of the installation. (Tip for any do-it-yourselfer: make sure to marry a supportive and patient spouse!) After re-doing all the connections back in the attic and trying several things on the new switch, we came to the conclusion that the problem must be with the switch (which was unlikely) or the physical wires themselves (which was highly unlikely). Just by chance I happened to tug on one of the white wires that I had secured with a wire nut and...it came right out. Just like that I knew exactly what the problem was and how to fix it. I simply grabbed the white wires connected by the new switch, trimmed the copper a bit, screwed the wire nut back on, and voilà! It worked! Oh joy! Rapture! The new unit was functioning properly!

All that was left to do was secure the vanity plate to the wall, dig my tools out of the attic, and clean the place up.

The weird thing about the new unit is it's really not all that different from the old one, except it works properly. Home repairs can be like that sometimes: simply maintaining the status quo can involve more time and money than you would ever expect, and when you are finished you often find yourself in roughly the same position as when you started. The only difference, of course, is that whatever you fixed or replaced probably works a lot better or will last a lot longer, which might not be as fun as a new computer or home theater system but probably a lot more practical.
One other thing that helps when encountering home repairs like this is to have money already set aside so the cost of the repair doesn't break the bank. My wife and I have put money away for home repairs each month since we purchased our house, and we rarely dip in to this reserve fund. We keep it only for major repairs, and because of that when we had to absorb the cost of this new HVL unit we didn't really have to think about how to pay for it or what we would need to sacrifice in the coming months. We also did not have to get a cheapo unit because we couldn't afford the nice one. While setting aside money in a fund might seem unnecessary at times, I promise you it is worth it in the long run and something I highly recommend if you are not doing it already.
Of course the final step in all this process was a prayer of thanks, followed by a lot of horsing around with my son who didn't see much of his daddy this past weekend.
Friday, January 04, 2013
Out with the old, in with the old
Our house isn't super new, but it's not super old either. It was built in 1987, which means it's got enough history to have character, but enough modern features to not require remodeling or massive updating. In fact, except for a new stove and cooktop, there really isn't much in the house that could use replacing either. In short, the house suits us quite nicely which is great because we would rather not spend our time and money fixing things :) But at 25 years old the house is no spring chicken, and a few parts are starting to show their age. Case in point: the bathroom ventilation fan:
It's an old NuTone H965 heat/light/vent combo unit, which is probably as old as the house. Ever since we moved in, the vent motor has sounded somewhat clunky, though it does still serve its basic function of moving air from the bathroom out into the attic. In the past few weeks though, it has started to develop a new problem: it won't turn on. Or, rather, it turns on veeeery slowly. Sometimes it takes a few seconds for the fan motor to kick in, and sometimes more than a minute during which time it emits a low-frequency hum as the electric current struggles to turn the squirrel cage. Based on the parts list for the unit, we were looking at roughly $100 for a new fan assembly or we could just replace the entire combo unit entirely. Neither one was an enticing prospect, but that's part of the deal when you sign the papers for a home purchase.
However, I wanted to try my hand at a third option before plunking down a Benjamin on replacement parts and such. To that end I figured I might as well bust out the ol' air compressor and clean the fan and motor out just for ol' times sake. It was a fairly simple process...for the most part. First I shut off power to the unit in the circuit breaker box, and since most of these heat/light/vents have their own breaker it meant that everything else in the bathroom still functioned. The next step was to remove the fan motor, which was accomplished by taking out three screws and then literally unplugging it.
After that I brought the assembly out to the garage and blew it out with the compressor...and wow. Such a massive cloud of dust burst forth that one would have thought it was a July 4 firework! That thing was so incredibly dusty, presumably because it had not been cleaned in over two decades, that it was just caked with gray particles. After the dust was gone I took apart the motor assembly, oiled the drive shaft, and put the whole works back together. Then it was a simple matter of plugging everything back in and voila! Good as new, except for a bit of a rattle that was there before but not quite as pronounced anymore.
All in all I'm happy that things went so smoothly, and we saved $100 in the process. The only problem with this whole operation though is that it didn't really work.
Sure the fan sounded great...for about one day. After that it was up to its usual tricks again, and I think something is worn out in the motor itself that no amount of simple cleaning and lubrication can fix. Looks like we'll be headed to the hardware store after all! And if we do end up buying a new fan I promise I will take plenty of pictures for the blog :)
Wednesday, November 28, 2012
Apertures Explained
As I re-read my recent post about a photo I had taken, I realized that I might have left some people hanging with regard to camera apertures. I touched on what an aperture is, but didn't really tie it back to the 50mm lens I wrote about. Nor did I properly explain just what apertures have to do with photography other than making parts of the image blurry and others in focus. This, then, is sort of a follow-up to my "Mockingbirds, Photoshop, and Miss Maudie" post but it's really just designed to be a tutorial on one of the basic functions of a camera. If you have not read that entry yet, I encourage you to do so as it introduces some concepts that will be covered here like depth-of-field.
Let's start at the beginning: cameras takes pictures by capturing light on an electronic sensor. Prior to digital cameras, this sensor was a piece of film but nowadays it's a microchip that essentially performs the same function.
The light that hits the sensor is controlled by the lens of the camera, which is the big cylinder-like object that sticks out from the front. All cameras have a lens, even small ones like on an iPhone. The lens is what lets light come in and hit the sensor which is inside the camera body.
 Every camera camera lens also has a mechanism that controls how much light is allowed to enter through the front and pass to the shutter. The size of this opening is called an aperture, and it is one of the three key pieces that, when put together, control much of how photography works (the other two being shutter speed and ISO, but we'll get to those another time). It's a lot like how our own eyes work, actually. Have you ever woke up in the morning, turned the lights on too soon, and had to squint or close your eyes quickly because things were so bright? That's because when it's dark, our pupils open wide in order to let in more light. And in bright light, our pupils shrink because there is so much light they simply don't need to be open in order to let enough in. For example, in the image below the pupil on the left is dilated and will let in a lot of light. The pupil on the right is contracted and not much light will be let in. At night or in dark conditions, our pupils open big to let in every bit of available light, but in the daytime our pupils contract because there is so much light around us that they don't need to let it all in for us to see properly.
Camera lenses work in the exact same way: when the aperture is wide open, a lot of light is able to enter. And when the aperture is small, not much light will enter. But what does all this have to do with taking pictures? Good question. For what I hope is a decent answer, here's a video I made that addresses this:
When my wife and I were looking at DSLR cameras, I was surprised to find out that most of the standard lenses they came with could barely zoom in and out. A common 18-55mm "kit" lens doesn't really zoom in that much, and this confused me. Our Panasonic ZS7 had a monstrous zoom lens, so why wouldn't a fancy DSLR have the same thing? Because even though our ZS7, and most pocket cameras nowadays, have lenses that can zoom in and out, they make a critical compromise in order to do so: they can't let in very much light. And not only that, but the image sensor (or film) inside most pocket cameras is much, much smaller than those found in DSLR cameras.
When a lens goes from wide-angle (you can see lots of stuff) to telephoto (you zoom in), the physical elements of the lens's construction behave in such a way that the maximum aperture (or opening) of the lens almost always shrinks. It's just not physically possible to keep a really big aperture when zoomed in, unless you spend thousands of dollars on a mega-fancy lens. And in bright light situations, like a nature hike or backyard picnic or outdoor sporting event, this is fine because there is so much available light that the camera does not need a very big aperture in order to get enough light to take a nice photo. You can even zoom in on things, like a woodland critter or a single athlete, and take a decent picture because the camera has so much light to work with. But when taking pictures indoors or at night, it is simply not possible for the apertures on many small cameras to be big enough to let enough light in. This is why most cameras have a built-in flash: they have to create their own light in order to make up for their small lenses, which are incapable of letting a large amount of light through the lens to reach the image sensor.
Another way to compensate for a small aperture is to leave the shutter open longer, which gives the image sensor a longer period of time to collect the available light coming in. This is fine if the subject of the photograph remains still, but in most situations either the subject is moving or the camera is moving. Using a tripod can eliminate the latter problem, but if you are taking pictures of, say, your daughter's evening soccer game it's somewhat impractical to ask the team to freeze motionless in the middle of a play while you snap a picture. But like I said earlier, in bright daylight this sort of thing is not a problem. A camera with a small aperture doesn't need to have the shutter stay open very long in order to let in enough light for a picture to be captured, which is why a pocket camera with a long zoom lens is just fine in many circumstances. On the flip side, leaving the shutter open for a longer period of time can produce very pleasing photographs given the right conditions.
Let's back up for a minute here, and take a look at the 50mm prime lens now that we have discussed various aspects of a lens aperture. This lens, and others like it, doesn't zoom in and out, but it does have a big maximum aperture of f/1.8 (for an explanation of how apertures are measured, check out the excellent Wikipedia entry on F-numbers or the DPReview glossary). This means that it captures a lot of light--enough such that a flash is rarely necessary, even indoors or in lower-light conditions. It is also capable of a very shallow depth-of-field, which I discussed in my Mockingbird entry as well. These features make it an incredibly versatile lens, provided you are not trying to capture a wide angle of view. Let's compare this to the kit lens from earlier. While the kit lens does zoom in and out, it has some significant drawbacks that must be considered. When it is zoomed out all the way to 18mm, its maximum aperture is f/3.5. When the lens is zoomed in all the way, its maximum aperture is f/5.6. (For an explanation of what it means to say 18mm, 50mm, etc., check out the excellent Wikipedia entry on focal lengths or the DPReview Glossary.) This means a couple of things:
• In order to make the lens let in as much light as possible (f/3.5), the lens has to be at its widest-angle setting of 18mm. Indoors or in low-light settings, a flash might not be necessary.
• When zoomed in all the way to 55mm, the lens is not capable of letting in much light (f/5.6). Indoors or in low-light settings, a flash is almost always necessary.
These limitations are not necessarily a bad thing, but they are important to know when shooting. Also, a kit lens is relatively cheap, which makes it a good choice for photographers who want a lens that, while not perfect, is decently suited for a variety of settings. For the sake of comparison, let's look at the Nikon 27-70mm f/2.8 lens.
This lens, while heavier and significantly more expensive than a kit lens, has the significant advantage of maintaining a maximum aperture of f/2.8 across its entire zoom range of 24-70mm. This means that indoors or in a low-light setting, a flash is probably not necessary and the lens is capable of a very shallow depth-of-field. These properties make this a far more versatile lens, and ideal for an incredible variety of settings...provided you are willing to fork over almost $2000 for it.
Let's bring this back to the realm of pocket cameras, like my Panasonic ZS7, which I said had a "monstrous zoom lens." Keep in mind that in order to get a telephoto zoom lens on a little camera with a little image sensor, the lens aperture has to be (thanks to the laws of physics) super duper tiny. Compare that to the Sigma 200-500mm lens which really is a monster, and has an incredible zoom while maintaining a freakishly large aperture of f/2.8 for the entire range:
Kind of impractical to carry around to your daughter's soccer game, eh?
Before I wrap this up, I want to touch on one critical question that many people still have: how do you set the aperture on your lens? On many pocket cameras, you can't. Most of the time this is controlled by the camera's internal software, though many cameras have scene-specific modes such as "Sports," "Fireworks," "Beach," etc. that contain aperture-and-shutter-specific presets for a few given scenarios. Some pocket cameras do have manual control options that allow you to set the aperture, shutter, and ISO, but they are often hidden in various menus or control dials. If you have a pocket camera it's worth checking out, though, and some even have dials that say something like "M A S P" or "M Av Tv P"
M = Manual. You have full control over the aperture and shutter values.
A/Av = Aperture mode. You control the aperture of your lens, and the camera determines the appropriate shutter speed.
S/Tv = Shutter mode. You control the shutter speed, and the camera determines the appropriate aperture setting.
P = Program auto. The camera determines what it thinks are the best aperture and shutter values.
To adjust the aperture, switch to A or Av mode (you can also use the M mode, but that's a tad more complicated) and you will then be able to set the aperture of your lens using a dial or series of buttons on your camera. Keep in mind that a smaller number means a bigger aperture, or more light coming in to the lens. A bigger number means a smaller aperture, or less light coming in to the lens.
So that's the basics, folks! There's a lot I didn't cover here, and a lot that I didn't really explore in depth, so if you have questions just leave me a comment below and I will be happy to help as best as I can :)
Let's start at the beginning: cameras takes pictures by capturing light on an electronic sensor. Prior to digital cameras, this sensor was a piece of film but nowadays it's a microchip that essentially performs the same function.
 |
| Kids today will have no idea what this stuff is. |

 |
| Image courtesy of Aurora Health Care |
When my wife and I were looking at DSLR cameras, I was surprised to find out that most of the standard lenses they came with could barely zoom in and out. A common 18-55mm "kit" lens doesn't really zoom in that much, and this confused me. Our Panasonic ZS7 had a monstrous zoom lens, so why wouldn't a fancy DSLR have the same thing? Because even though our ZS7, and most pocket cameras nowadays, have lenses that can zoom in and out, they make a critical compromise in order to do so: they can't let in very much light. And not only that, but the image sensor (or film) inside most pocket cameras is much, much smaller than those found in DSLR cameras.
When a lens goes from wide-angle (you can see lots of stuff) to telephoto (you zoom in), the physical elements of the lens's construction behave in such a way that the maximum aperture (or opening) of the lens almost always shrinks. It's just not physically possible to keep a really big aperture when zoomed in, unless you spend thousands of dollars on a mega-fancy lens. And in bright light situations, like a nature hike or backyard picnic or outdoor sporting event, this is fine because there is so much available light that the camera does not need a very big aperture in order to get enough light to take a nice photo. You can even zoom in on things, like a woodland critter or a single athlete, and take a decent picture because the camera has so much light to work with. But when taking pictures indoors or at night, it is simply not possible for the apertures on many small cameras to be big enough to let enough light in. This is why most cameras have a built-in flash: they have to create their own light in order to make up for their small lenses, which are incapable of letting a large amount of light through the lens to reach the image sensor.
 |
| A 110 camera with a stack of single-use flash bulbs. I actually had one of these when I was a kid :) Image courtesy of Wikipedia |
 |
| Ever wonder how photographers get shots like this? They shoot in low light with a tripod and leave the shutter open for a long time :) Image courtesy of user TuffTuffTuffTuff on Reddit |
• In order to make the lens let in as much light as possible (f/3.5), the lens has to be at its widest-angle setting of 18mm. Indoors or in low-light settings, a flash might not be necessary.
• When zoomed in all the way to 55mm, the lens is not capable of letting in much light (f/5.6). Indoors or in low-light settings, a flash is almost always necessary.
These limitations are not necessarily a bad thing, but they are important to know when shooting. Also, a kit lens is relatively cheap, which makes it a good choice for photographers who want a lens that, while not perfect, is decently suited for a variety of settings. For the sake of comparison, let's look at the Nikon 27-70mm f/2.8 lens.
 |
| *drool* Image courtesy of Nikon USA |
Let's bring this back to the realm of pocket cameras, like my Panasonic ZS7, which I said had a "monstrous zoom lens." Keep in mind that in order to get a telephoto zoom lens on a little camera with a little image sensor, the lens aperture has to be (thanks to the laws of physics) super duper tiny. Compare that to the Sigma 200-500mm lens which really is a monster, and has an incredible zoom while maintaining a freakishly large aperture of f/2.8 for the entire range:
Before I wrap this up, I want to touch on one critical question that many people still have: how do you set the aperture on your lens? On many pocket cameras, you can't. Most of the time this is controlled by the camera's internal software, though many cameras have scene-specific modes such as "Sports," "Fireworks," "Beach," etc. that contain aperture-and-shutter-specific presets for a few given scenarios. Some pocket cameras do have manual control options that allow you to set the aperture, shutter, and ISO, but they are often hidden in various menus or control dials. If you have a pocket camera it's worth checking out, though, and some even have dials that say something like "M A S P" or "M Av Tv P"
M = Manual. You have full control over the aperture and shutter values.
A/Av = Aperture mode. You control the aperture of your lens, and the camera determines the appropriate shutter speed.
S/Tv = Shutter mode. You control the shutter speed, and the camera determines the appropriate aperture setting.
P = Program auto. The camera determines what it thinks are the best aperture and shutter values.
To adjust the aperture, switch to A or Av mode (you can also use the M mode, but that's a tad more complicated) and you will then be able to set the aperture of your lens using a dial or series of buttons on your camera. Keep in mind that a smaller number means a bigger aperture, or more light coming in to the lens. A bigger number means a smaller aperture, or less light coming in to the lens.
So that's the basics, folks! There's a lot I didn't cover here, and a lot that I didn't really explore in depth, so if you have questions just leave me a comment below and I will be happy to help as best as I can :)
Subscribe to:
Posts (Atom)