The video contains around 1800 pictures shot at 14-second intervals throughout the course of roughly eight hours. But this post isn't so much about the movie or the tornado shelter, but how I went about creating and editing the final video.
For starters, I knew I had a couple of issues to deal with up front. The first was the issue of power, or lack thereof. My camera battery lasts a while, but there is no way it would have done a shoot like this without losing power after an hour or two. At first I thought I would ask a coworker if I could borrow his battery pack, and he graciously consented. But shortly thereafter it hit me that even the mighty battery pack would only last three or four hours, which meant I was going to have to buy a power cord. Nikon sells one for $128, but I found an off-brand model on Amazon for about $25. If someone is doing these sorts of projects on a regular basis it would probably be wise to get the name-brand adapter since other companies can use substandard electronic components that might not be good for regular use, but for the occasional project it's probably fine.
Next up was the lens. Regular readers know I'm a huge fan of the 50mm f/1.8 lens, but it just wasn't going to cut the
• 18mm wide angle meant it could capture as much of the garage as I needed
• 3.5 maximum aperture would be fine since the photoshoot was outside in the daytime, which meant plenty of available light
• It's not incredibly expensive, so if it got broken or cracked by a piece of flying debris I could buy a replacement without breaking the bank.
 |
| Behold, the kit lens! Sometimes it's all you need to get the job done. |
• Lens zoomed out to 18mm, to capture as much of the garage as possible.
• Focus distance set manually to infinity. Autofocus would have been a mess, because the camera would have focused on all kinds of different things throughout the day. Manual focus ensured that every picture was focused exactly the same.
• Aperture opened to f/3.5, to let in as much light as possible given that the shoot would start before there was much daylight.
• Shutter speed set at 1/60, which would capture movement without much blur. In hindsight I could have set this a little slower, like 1/30.
• ISO set to 800. Normally I don't like going up to 800 because the D200 gets a little noisy, but I was trying to get the early morning pictures to be properly exposed.
• Matrix metering, since I needed a good overall exposure. I often use Spot metering if I want to make sure a certain point on the image (usually the focus point) is properly exposed, but Matrix metering basically looks at the entire photo when adjusting exposure rather than just one point. This would be much more useful given the nature of this photo shoot than Spot or Center-Weighted metering.
I shot in Shutter Priority mode, which meant the camera would be adjusting the aperture throughout the day in order to maintain proper exposure. That was preferable to setting one aperture and letting the camera adjust shutter speed, since I wanted to minimize blur in the photographs.
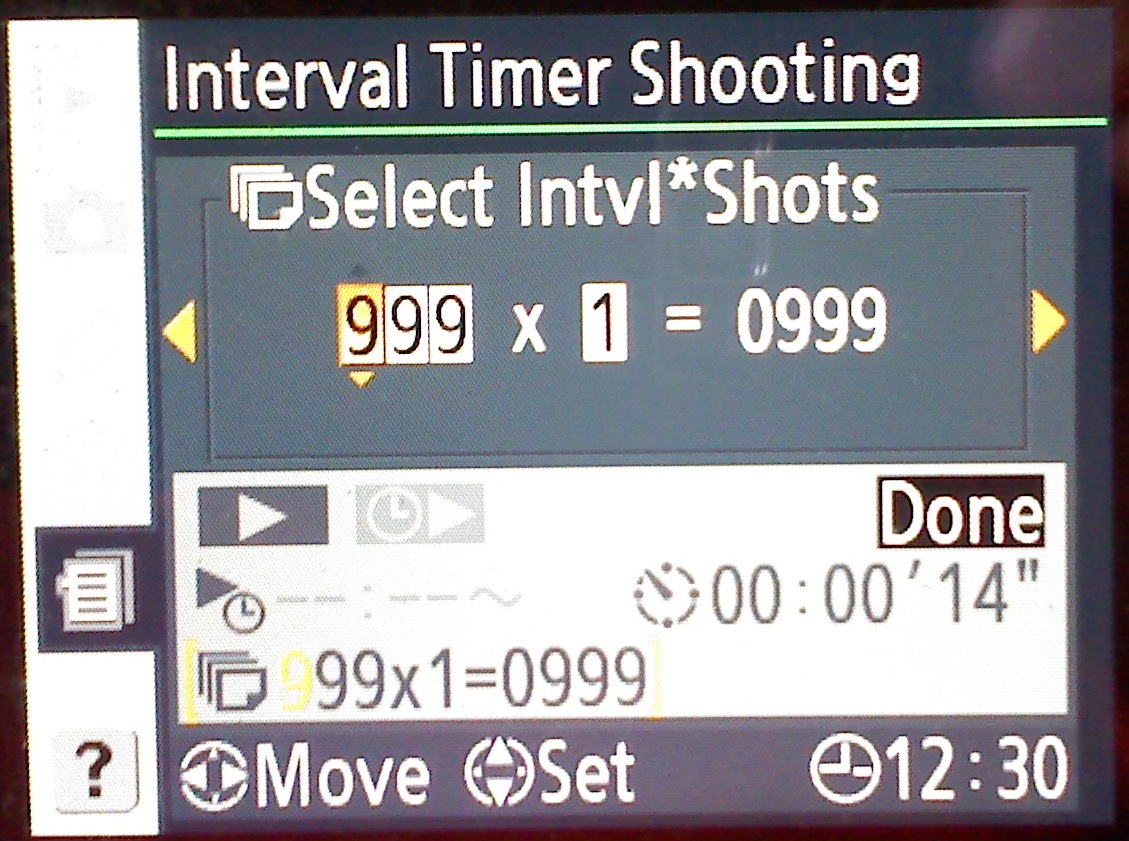 |
| Setting the intervalometer on my Nikon D200 |
If you are setting up for your own time-lapse shoot, you might try this online time-lapse calculator. It will help you figure out which intervals to use and how many pictures to shoot given the constraints and conditions of your photo shoot.
Before I went back to work I reset the timer again, which resulted in a total of 2160 pictures taken throughout the entire day. I will be posting a tutorial of how I turned those into a 2.5-minute video in a few days, but suffice it to say it was much easier thanks to some of the innovations Apple introduced with FCPX compared to their previous offerings like Final Cut Pro 7 and Final Cut Express.